Tutorial - Solder Stencil with Eagle and the Silhouette Cameo Vinyl Cutter
How to create a stencil for surface mount solder paste with Eagle and the Silhouette Cameo vinyl cutter.
Step 1- Design your circuit in Eagle;
- tutorial for the Schematic;
- tutorial for the Board.
Step 2 - Export the parts footprints as .dxf files:
- Download the cream-dxf.ulp file (a custom DXF exporter)
- and save it in the ulp file of Eagle in your Application folder.
Step 1- Design your circuit in Eagle;
- tutorial for the Schematic;
- tutorial for the Board.
Step 2 - Export the parts footprints as .dxf files:
- Download the cream-dxf.ulp file (a custom DXF exporter)
- and save it in the ulp file of Eagle in your Application folder.
| cream-dxf.ulp |
To export DXF files for top and bottom surface-mount pads (cream layers):
- Open your board file in Eagle;
- Go to File-->Run, and select the cream-dxf.ulp.
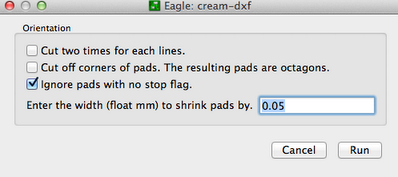
- A pop-up window will appear. Do the following:
- Uncheck "Cut two times..."
- (Leave "Cut off corners..." unchecked.)
- (Leave shrink width at 0.05 mm, or alter as you see fit.)
- Click Run.
- This will generate filename-tcream.dxf and filename-bcream.dxf files in the folder containing your filename.brd file.
One note about DXF: It appears that it does not encode an indication of units.
This DXF exporter uses millimeters, which is what Silhouette Studio assumes.
Step 3 - Importing into Silhouette Studio and Cutting
- If you have the Adobe Suite installed, download the Silhouette Cameo connect freeware.
- if you do not have it, go ask for the installation CD available at the ER;
- Set up the Silhouette preferences as following (just one time):
One note about DXF: It appears that it does not encode an indication of units.
This DXF exporter uses millimeters, which is what Silhouette Studio assumes.
Step 3 - Importing into Silhouette Studio and Cutting
- If you have the Adobe Suite installed, download the Silhouette Cameo connect freeware.
- if you do not have it, go ask for the installation CD available at the ER;
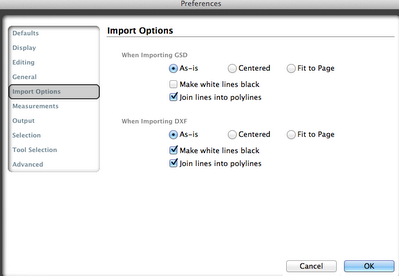
- Set up the Silhouette preferences as following (just one time):
- In the Import Options, under "When Importing from DXF" uncheck "Scale to fit page."
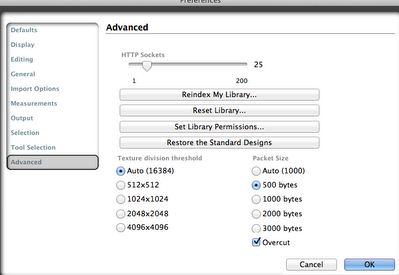
- In the Advanced group, under "Packet Size" select "500 bytes" (default is 3000). Without this change, when cutting a large/intricate design that takes a long time (e.g. cutting a stencil at a slow speed), Silhouette Studio can have a problem where it loses the connection with the Cameo, which shortly thereafter aborts the job.
Step 4 - Prepare the cut file in Silhouette Connect :
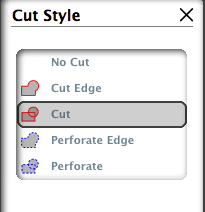
- Select all and go to the Cut Style window (icon is at the upper right of the interface). Select the CUT option.
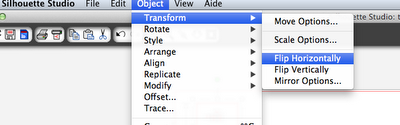
NOTE: The bcream (bottom) pattern will appear as viewed from the top of the board (i.e. mirror image of how you'll put it on the board). To correct this, select it and do Object/Transform/Flip Horizontally.
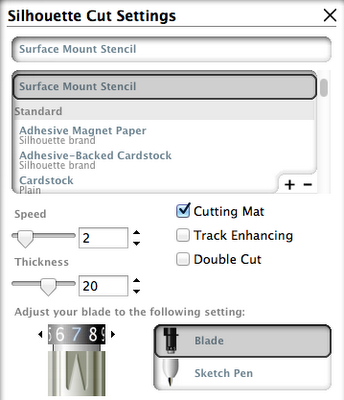
5. Go to the Cut Settings window . Create a new media option by clicking on the + sign and name it "Surface Mount Stencil" and organize the settings as follow:
- Speed 2;
- Thickness 20;
- Cutting Mat;
- Unselect Double Cut
- Adjust blade to 7;
- Select "Blade".
Step 5 - Load the media in the vinyl cutter
- Connect the vinyl cutter to your computer with the usb cable;
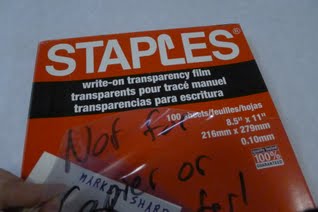
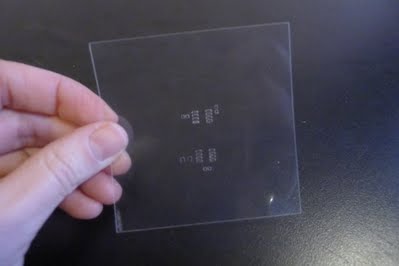
- We use Write-on transparency film as material for the stencils:
- Connect the vinyl cutter to your computer with the usb cable;
- We use Write-on transparency film as material for the stencils:
- Put one sheet on the Silhouette Cameo cutting mat:
- Turn on the vinyl cutter and load the media according to this tutorial:
- adjust the blade following this tutorial (the interesting part is at 6:00 minute):
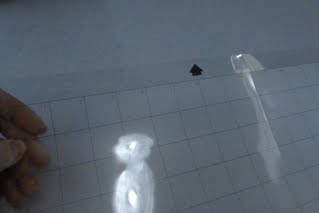
Step 6 - CUT
- Move your image to the location where it should be cut on your material. (When open, it will appear in the lower left of a 12x12 sheet.)
- Press CUT at the bottom of the Cut settings menu
- Move your image to the location where it should be cut on your material. (When open, it will appear in the lower left of a 12x12 sheet.)
- Press CUT at the bottom of the Cut settings menu
- Once you are done, thank you for cleaning the cutting mat with a scraper to take off all the little pieces that were cut off.
